Daniel's pics of his connected rain barrels reminded me I had bought the hardware to connect a second one a few months ago and hadn't ever done it. So I finally got it connected today. Can't wait to see how the connector to the second barrel works when we have a good rain.
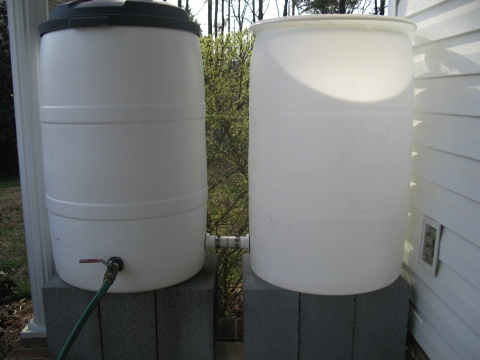
The two barrels:

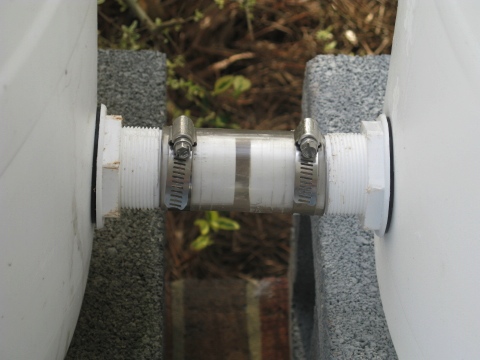
The connector -- bulkhead fittings on each barrel connected by a clear plastic tube:

The idea for the connector being at the bottom of the barrels allows both barrels to fill together and empty together with only one outlet hose needed for both barrels. My neighbor, John, suggested this configuration last year when we were discussing rain barrels and it made sense. We'll soon find out!
And btw -- that avocado I discovered that made it through the winter? Not an avocado. After I dug it up and potted it and looked more closely, it's not an avocado even though the leaves are very similar. So that means 100 percent of the avos died during the winter -- glad to have that settled.
The two barrels:

The connector -- bulkhead fittings on each barrel connected by a clear plastic tube:

The idea for the connector being at the bottom of the barrels allows both barrels to fill together and empty together with only one outlet hose needed for both barrels. My neighbor, John, suggested this configuration last year when we were discussing rain barrels and it made sense. We'll soon find out!
And btw -- that avocado I discovered that made it through the winter? Not an avocado. After I dug it up and potted it and looked more closely, it's not an avocado even though the leaves are very similar. So that means 100 percent of the avos died during the winter -- glad to have that settled.


Nice job. I was going to ask Emily about the news story and video (Matt's double barrel set up)when I see them today. I'll let you know if I can find it then. Sorry about the avocado :) Jen
ReplyDeleteHey, I think I like your hardware better than mine. Your connector will allow much faster water transfer. The only downside I see is the inflexibility and need for a pretty robust platform because the connection is so rigid. But I bet yours was cheaper than my spigots. My hose connection will allow for more variable landscape. BUT, can you explain, maybe in comment, exactly what hardware you used and how you drilled the hole? I really like it and would like to try your configuration on the next two I build. Way to go!
ReplyDeleteDaniel
I believe your set-up has more advantages than mine:
ReplyDeleteINFLOW: The guy at the hardware store talked me into a wide diameter "pipe" connector to be able to keep up with the rapid inflow of water from the gutter. Makes sense, but the average rain lasts long enough to eventually fill the second barrel -- the rain might be overflowing out of the first barrel before the second is full, but so what? Rain storms usually last long enough to eventually fill the second barrel, so I don't think a small diameter connector (like your hose) would be a problem.
OUTFLOW: Since outflow is limited by the size of the outflow hose, then your hose connector will keep up with outflow fine since they are the same size. My connector is 2-3 times larger than the outflow hose, but to what end? I can't transfer water from the second barrel any faster than it can leave via the outflow hose on the first barrel.
FLEXIBILITY: Yours is obviously better -- the ability to move the barrels around and not be limited by the static connector that I have. You could put a much longer hose between the two if needed.
COST: The bulkhead fittings aren't cheap, probably more than your brass spigots -- certainly not any cheaper.
FITTINGS: I ordered bulkhead fittings off the Internet for the spigot on my first barrel, then bought them (two, plus rubber washers, two for each connector -- one inside, one outside the barrel) at Renfrow's hardware to connect the two barrels (one bulkhead fitting for each barrel). The 2" diameter plastic hose is also from Renfrow's. They have a guy there who's good at piecing stuff together -- he helped me figure out the system to connect the barrels.
HOLES: The bulkhead fittings require a 2" hole (there are lots of different sizes of bulkhead fittings). I first drilled a 1 5/8" hole with a paddle bit on my drill, then used my jigsaw to expand that hole to 2". After cutting the tops off both barrels, you stick the bulkhead fitting through from the inside (hopefully a tight fit, pounded in with a rubber mallet, if you got the 2" hole about right), then screw a large nut (the other half of the bulkhead fitting) on the outside (with rubber washers in between), then tighten it down with channel locks and/or pipe wrench. The washers and tight fit keep water from leaking out. Then connect the two external parts of the bulkhead fittings with the plastic hose and hose clamps.
My only question regarding your set-up was how you anchored the spigots in the sides of the barrels. Looked like you had "caulking" around them (?) -- anything anchoring them on the inside?
My connection might be a bit stronger, but all in all I don't see a lot of advantages over yours.
P.S. I also learned a hard lesson about freezing during the winter. The brass outflow spigot on barrel #1 sat with water in it during the winter and on one of our hard freeze nights the ice put a slight crack in the brass fitting so it leaked a little when I would turn the water on. So while I was working on the barrels yesterday I took the spigot off, dried it good with a hair dryer, then applied some two-part J.B. Weld metal patch to the crack. Hopefully that will seal it, though the barrels are empty at the moment and I haven't tested. Next winter I'll have to either wrap the spigot with some kind of insulation or drain the barrel when the temps drop really low.
ReplyDeleteAlso developed huge amounts of dark green algae in the barrel, probably from not using/draining it frequently enough during the winter. I may experiment with putting a very small amount (tablespoon?) of bleach in each barrel -- just enough to discourage algae growth. Any ideas? Also considered a quarter or half of a chlorine tab like you use in a swimming pool skimmer, but obviously don't want to put a lot of chlorine in the water.
I am curious whether you are right about the average rain and filling two buckets. You may be right but I am remembering all of these torrential but short downpours. My worry was on the occasion where you get a quick nasty downpour and then no rain for days you could get stuck with water filling the first barrel, overflowing, rain stops, and then you have 2 half/barrels instead of two full. The difference between my 3/4" hose and your 2" connection appears to be significant not to mention the advantage regarding clogging. I assume my 3/4" hose will clog faster.
ReplyDeleteI found a plastic washer/nut that just barely grabbed the threads of the spigot on the inside of the barrel. I drilled a 5/8" hole for my 3/4" male ends (on the spigot) and then literally hand-turned the threads of the spigot into the plastic body of the tank. It was hard but gave the spigot extra hold and stiffness not to mention sealing the hole. The plastic washer/nut should be substantial enough to provide support and I think the caulking was superfluous.
I have two more to connect and may try to find these pieces you used. Thanks for the detailed explanation.
Daniel
You may be right on the flow question. Ideal would be a very flexible 2" hose of some sort. The clear plastic hose I used is very thick-walled and stiff. Would be nice to find a thin-walled (flexible) 2" hose to get the flow, but also the flexibility of arrangement that you set-up allows. Will be interesting to see if you get any half-full barrels with the rain this summer.
ReplyDeleteGood mornin'...
ReplyDeleteJust looking at you rain barrels, again. To me they are a work of art...I love it when simple things create great solutions!
Blessings on your day, mi amigo...Priscilla